Search This Blog

Tuesday, May 14, 2019

DT post for Iqcg. -butterfly

Hi crafty followers,


This month my DT position requires me to quill a butterfly.  Who does not love butterflies?  And so do I.  I have a butterfly garden in my backyard and I thoroughly enjoy my summer months watching these flutter by's.  There are innumerable colours and patterns found in this fairy tale insects.  Blue is always dreamy. And so I decided to quill my butterfly in blue a mystic combination of 2 different shades of blue.

I cut a outline of butterfly in black  using my new Cricut machine and quilled on top  of it.  Isn’t it beautiful?


Tuesday, April 16, 2019

DT post for IQCG-Birthday Themed ATC's


Hello Crafting peeps,


  I  enjoyed creating this inspiration  as a DT post for Indian Quilling challenges Group.  Artist Trading Cards (ATC's) are typically samples of creative work made primarily to exchange with artists. This is my first time creating an ATC.   I decided to give it a twist by making it in a birthday theme so that it can be used as a mini card also.

It is indeed a challenge to make tiny quilled embellishments with paper widths of 3mm or less.  Look for birthday balloons, party hat, cake, gifts etc on my ATC's.


I stamped a banner  and birthday sentiment on to a cardstock measuring 2.5 x3.5 inches. Embellished them with quilled balloons, birthday cake, party hat, and gift.   There is something different that I did.  Look for the cat. Guess if you can 😉


Get inspired and keep quilling.

Friday, March 22, 2019

Flowers in a vase--DT post for IQCG


Hello Quillers,

A warm welcome to you as well the SPRING season.   Everybody loves the spring.  And spring reminds us of flowers, fresh grass, butterflies and rain.  
   
I chose to quill flowers and arrange them in a vase for my inspiration post.   I took a canvas drew an image of a vase and stencilled a damask design on it.  Using a sponge, dabbed shades of blue and purple as a background for my flowers. Rest of the canvas I coloured  black using the sponging technique.

Now for the quilling  part,  I used various techniques to quill sunflower, tulips, pansy,hydrangea, daisy etc.  Arranged all the flowers above my vase and added quilled leaves, foliage and cut out leaves.


use an acrylic spray to protect your art. It helps keep off dust.
Happy quilling
Happy to participate in the following blogs


Thursday, February 21, 2019

Teddy Love-- DT post for IQCG #55

Hello there,

I am back to blogging after a long time. Hopefully I will find time to post regularly. I am very happy and excited to be part of the Design team at INDIAN QUILLING CHALLENGES GROUP.

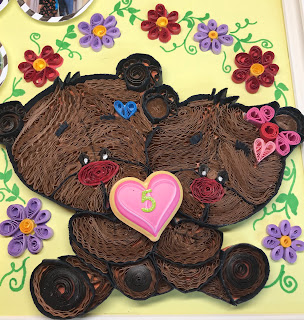
This is my first DT post.  The topic of the challenge being MY PASSION MY LOVE, I decided to quill teddy bears in love.  For a long time I wanted to try something with furry effect. The main technique used in this project is Crimping.

These quilled teddy bears in a floral garland I decided to use it  in a photo inclusive layout and framed it in a double matted silver frame.  The framed work is a 5th anniversary keepsake of a lovely couple depicting their five year journey..


Quilling techniques used
1. Crimping
2. Tight Coil/loose coil
3. Edgework
4. Teardrop
5. Beehive


I took a printed drawing  of the picture and did the Edge work with black quilling strip(I cut my own card stock strips)Filled the bear with crimped brown strips with stacking method.Added hearts and the ribbon bow in respective colours  by making a a teardrop.  I used the beehive technique for the ears.  For the foot and centre of flowers tight/loose coils are used.  I made a few flowers  and arranged it in a arch around the teddies and using sharpie drew the branches.


Arranged these along with the photos of the couple on a yellow cardstock. Added few wooden sentiments to complete the look..


Hope you liked my work.  Feel free to leave your valuable comments. Thanks for stopping by.


Tuesday, February 19, 2019

Typography and edgework 1 nameboard

Hi all,


Let me first apologize for not updating my blog.  Had been busy with lot of  custom orders.

This post is about making a wall frame with a quilled name. This was done in May 2018.  Better late than never.  Let me get to it.


The requirement was in shades of  pink colour for a girls room.  So I selected various shades of pink  (almost 7 different shades) in varous widths.


 I decided to make the actual name in white to make it stand out.  I cut my own strip from white cardstock.  On a white cardstock background I pasted the completed name (Technique Typography).  To incorporate the various shades I decided to make it like a gradient.   Made swirls from the strips and glued  them on  around the name.


To give impression of a crown I made a floral design above the first alphabet of the girls name.  To make the floral shape i pinched the swirls at one end to make a teardrop for the petal and made a tight coil with a contrast colour for the centre.  To give dimension to the work I added few tight coils randomly in between the swirls.


To make the wall decor more personalized I decided to incorporate the  picture of the girl into the frame. So made a circular frame with quilling strip and cut the photo to fit in and placed it on the top right corner.

Added few concentric circles with border buddy and made a scroll with two colour strips glued together.  added few other curved scrolls and tear drop shaped to fill in the space on the top.

Now for the bottom portion I added two flowers and  multicoloured scrolls to fill the spaces.

Hope you like my work.  Feel free to leave your comments. Those who wish to try doing this can do so. Any doubts you have I will be happy to clear them and help you create your masterpiece.


Happy quilling!!!